Showing posts with label Breads and Sandwiches. Show all posts

Tuesday, February 10, 2009

VEG PANINIS

Its been ten days since my last post. The reason: A new venture that has come my way. Off course the venture is related to food. My friend and I have come up with putting up a small tea stall outside a wellness center. Right now, its just an idea. We are talking to a lot of people and getting a feedback. And slowly realizing that its not going to be an easy cup of tea!!!!. With so many licensing and arranging funds, its a lot of planning and a lot of work. Hence no posts.

Will update all about the venture every now and then in my posts. As of now its recipe time.

Last week I went to Macy's and got this panini grill (we always wanted one). I think I got a fair deal for sixty bucks. So off course, I had to use this new addition to my kitchen. So panini it was.
first I made one for dinner with whole wheat bread (were not that good) and then made them again with panini rolls. This time it was crispier, cheesier and yummier. Here goes my recipe


You will need
  • panini rolls- 2
  • mayonnaise-2 tbsp
  • lettuce- 1 cup (chopped)
  • tomato sauce-2 tbsp
  • red and yellow roasted bell peppers - 2-3 *
  • cherry tomatoes-3-4
  • mozzarella cheese-2 slices
  • salt and pepper
  • butter
You have to
  1. In a bowl mix the mayo with the lettuce. add the tomato sauce and the salt and pepper.
  2. roughly chop the bell peppers.
  3. half the cherry tomatoes
  4. cut the panini rolls, spread the mayo and lettuce mixture.
  5. place the chopped bell peppers,the halved tomatoes and the slices of cheese.
  6. place the other slice of the roll. butter the top
  7. place on the hot grill / or griddle.
  8. grill till cheese melts.
  9. serve hot with soup/ salad or all by itself.

comforting!!!!!!!
*I used the roasted bell peppers from Trader Joe's. You can use raw bell peppers. Just saute it before putting it in the sandwich.

will be trying out lots of different sandwiches now.
enjoy and happy eating.

Wednesday, January 14, 2009

BAKED BEANS ON TOAST


Back in India, this was our all time favourite food. holiday brunches, evening snack, mom's quick fix to my friends hunger pangs.....

In kolkatta (my birthplace and where I grew up to taste some really yummy food), there was this place called FLURY'S (does that ring a bell to the calcuttans? that is if they are reading!!!!). A very English kind of a confectionery shop/restaurant, that had specials for brunches. And baked beans on toast was their all time famous breakfast item.


The baked beans that we get here in the grocery stores, is very different from the ones available in India. Here, its more thick (thanks to extra bit of corn syrup they must be adding) and sweet. When I started making this all time favourite dish at home I used the BUSH vegetarian variety, until one day my friend told me to use HEINZ. And that is what sent my taste buds down memory lanes. 

Well so here it is folks, a quick fix to satisfy a hungry stomach

You will need
  • Heinz baked beans- 1/2 can
  • chopped onions-1/2 cup
  • green chillies-1-2 chopped
  • coriander leaves-1 tbsp
  • grated mozzarella cheese-1 tbsp
  • red chilly flakes-1/2 tsp
  • salt and pepper- to taste
  • bread -2 -3 slices 
  • butter- to smear on the toast
  • olive oil-1/2 tsp
You have to
  1. preheat oven to 350 degrees.
  2. smear the slices of bread with butter
  3. toast the bread in the pre heated oven till nice and crispy. do not over toast it.
  4. heat the oil in a pan. add the chopped onions
  5. add the baked beans. here you might need to add some water as the baked beans is very thick.
  6. add the seasonings, along with the green chillies. let everything cook for about five minutes.
  7. place the toasted slices on a plate.
  8. top them with the baked beans, sprinkle some chopped coriander
  9. And lastly add the cheese.
  10. serve with tomato ketchup.

note: You can get innovative and use any bread. I used baguette as that is what I had. You could use regular white, wheat, or any other variety too. 

enjoy.

Tuesday, November 4, 2008

BREAD CRUMBS

I am actually thinking, is this a recipe that I really need to post. I mean how obvious it is, to make bread crumbs. But I actually made these because there was a loaf of baguette french bread lying on my kitchen counter for a week now. It had gone hard, but was not stale. And I just did not want to let it go.
I remember back in my nutrition classes in college, our kitchen lab attendant use to make bread crumbs out of left over bread. She use to slightly toast them in the oven and then pulse it in the mixer/food processor. She would have been proud of me. I actually put her idea to good use.

So here is the recipe.

You will need

bread (any type)

You have to
  1. toast the bread in the oven for 10- 15 minutes. they should not brown completely. Just get toasted.
  2. pulse it in the food processor or mixer.
  3. store in an airtight container in the fridge.
    note: this can be done with bread sides that are usually left after making sandwiches.baguette bread works just fine. You would not even need to toast it.You can added some grated Parmesan to this and some garlic salt to make an Italian version of the breadcrumb.

enjoy.

This is DAY 4 of the recipe marathon.

Check out what the other are putting out on the track......
1) DK 2) Siri 3) Srivalli 4) Ranji 5)PJ 6)Curry Leaf 7)Medha 8)Priya 9)Bhawna 10)Raaji 11)Ruchii 12)Anu 13)Kamala 14)Roopa 15)Divya Kudua 16)Rekha 17)Divya M 18)Lakshmi 19)Raaga 20)Lakshmi Venkatesh 21)Sripriya 22)Viji 23)Pavani

Wednesday, October 29, 2008

PIZZA LOVE

My dear husband can live on pizzas. That is one thing which he can eat nearly every day of the week without complaining. So when I saw this month's Daring Baker's pizza challenge,hosted by Rosa's yummy yums I was all excited. coz I knew that this is one dinner that my hubby is going to savour and enjoy.
With a few changes to the recipe, I went on to baking the dough and making yummmyyyyy pizzas.
It was a vegetarian pizza. I substituted two cups of all purpose flour with whole wheat flour.
though I did try out the tossing method (just to take a shot of it),I ended up rolling out the dough.
I made two twelve inches pizzas. I rolled out smaller crusts of the remaining dough, partially baked them and froze them for future use. I got three nine inches ones (approximate).
I used a twelve inch pizza tray to bake the pizza.

here goes the challenge


THE CHALLENGE: You have to use the tossing method (as explained below) for at least 2 Pizza Crusts. If you are not comfortable with it, then you can switch to the rolling method, but you HAVE to try the traditional method and exercise it, using at least two dough pieces. You should also capture the moment by either filming or photographing yourself while tossing the dough.

THE RULES: This month’s recipe leaves you with much freedom! You can either make the Pizza Dough gluten-free or the normal way. You may use the sauce (anything liquidy, saucy and spreadable like cream cheese, flavored oils, pesto, Nutella, Peanut Butter, pumpkin puree, etc...) and toppings of your choice, may they be savory or sweet, gluten-free, vegan, vegetarian or non-vegan/vegetarian. You must use BOTH (sauce & toppings).

RECIPE SOURCE: “The Bread Baker's Apprentice: Mastering The Art of Extraordinary Bread” by Peter Reinhart. Ten Speed Press, Berkeley, CA. Copyright 2001. ISBN-10: 1-58008-268-8, ISBN-13: 978-158008-268-6.


BASIC PIZZA DOUGH ~Original recipe taken from “The Bread Baker’s Apprentice” by Peter Reinhart.Makes 6 pizza crusts (about 9-12 inches/23-30 cm in diameter).

You need

4 1/2 Cups (20 1/4 ounces/607.5 g) Unbleached high-gluten (%14) bread flour or all purpose flour, chilled
I used 2 cups whole wheat flour and the rest all purpose.
1 3/4 Tsp Salt
1 Tsp Instant yeast
1/4 Cup (2 ounces/60g) Olive oil
1 3/4 Cups (14 ounces/420g or 420ml) Water, ice cold (40° F/4.5° C)
1 Tb sugar
Semolina/durum flour or cornmeal for dusting.

You have to

DAY ONE
1. Mix together the flour, salt and instant yeast in a big bowl (or in the bowl of your stand mixer).

2. Add the oil, sugar and cold water and mix well (with the help of a large wooden spoon or with the paddle attachment, on low speed) in order to form a sticky ball of dough.

3.On a clean surface, knead for about 5-7 minutes, until the dough is smooth and the ingredients are homogeneously distributed. If it is too wet, add a little flour (not too much, though) and if it is too dry add 1 or 2 teaspoons extra water.

NOTE: If you are using an electric mixer, switch to the dough hook and mix on medium speed for the same amount of time.The dough should clear the sides of the bowl but stick to the bottom of the bowl. If the dough is too wet, sprinkle in a little more flour, so that it clears the sides. If, on the contrary, it clears the bottom of the bowl, dribble in a teaspoon or two of cold water.The finished dough should be springy, elastic, and sticky, not just tacky, and register 50°-55° F/10°-13° C.

4. Flour a work surface or counter. Line a jelly pan with baking paper/parchment. Lightly oil the paper.

5. With the help of a metal or plastic dough scraper, cut the dough into 6 equal pieces (or larger if you want to make larger pizzas).

NOTE: To avoid the dough from sticking to the scraper, dip the scraper into water between cuts.

6. Sprinkle some flour over the dough. Make sure your hands are dry and then flour them. Gently round each piece into a ball.

NOTE: If the dough sticks to your hands, then dip your hands into the flour again.

7. Transfer the dough balls to the lined jelly pan and mist them generously with spray oil. Slip the pan into plastic bag or enclose in plastic food wrap.

8. Put the pan into the refrigerator and let the dough rest overnight or for up to three days.

NOTE: You can store the dough balls in a zippered freezer bag if you want to save some of the dough for any future baking. In that case, pour some oil(a few tablespoons only) in a medium bowl and dip each dough ball into the oil, so that it is completely covered in oil. Then put each ball into a separate bag. Store the bags in the freezer for no longer than 3 months. The day before you plan to make pizza, remember to transfer the dough balls from the freezer to the refrigerator.

9. On the day you plan to eat pizza, exactly 2 hours before you make it, remove the desired number of dough balls from the refrigerator. Dust the counter with flour and spray lightly with oil. Place the dough balls on a floured surface and sprinkle them with flour. Dust your hands with flour and delicately press the dough into disks about 1/2 inch/1.3 cm thick and 5 inches/12.7 cm in diameter. Sprinkle with flour and mist with oil. Loosely cover the dough rounds with plastic wrap and then allow to rest for 2 hours.

10. At least 45 minutes before making the pizza, place a baking stone on the lower third of the oven. Preheat the oven as hot as possible (500° F/260° C). NOTE: If you do not have a baking stone, then use the back of a jelly pan. Do not preheat the pan.

11. Generously sprinkle the back of a jelly pan with semolina/durum flour or cornmeal. Flour your hands (palms, backs and knuckles). Take 1 piece of dough by lifting it with a pastry scraper. Lay the dough across your fists in a very delicate way and carefully stretch it by bouncing it in a circular motion on your hands, and by giving it a little stretch with each bounce. Once the dough has expanded outward, move to a full toss.


my first try to tossing.


can you'll see the holes I managed to make!!!!!

my second try.


a little better.

NOTE: Make only one pizza at a time.During the tossing process, if the dough tends to stick to your hands, lay it down on the floured counter and reflour your hands, then continue the tossing and shaping. In case you would be having trouble tossing the dough or if the dough never wants to expand and always springs back, let it rest for approximately 5-20 minutes in order for the gluten to relax fully,then try again.You can also resort to using a rolling pin, although it isn’t as effective as the toss method.

12. When the dough has the shape you want (about 9-12 inches/23-30 cm in diameter - for a 6 ounces/180g piece of dough), place it on the back of the jelly pan, making sure there is enough semolina/durum flour or cornmeal to allow it to slide and not stick to the pan.

13. Lightly top it with sweet or savory toppings of your choice.

14. Slide the garnished pizza onto the stone in the oven or bake directly on the jelly pan. Close the door and bake for about 5-8 minutes.

NOTE: After 2 minutes baking, take a peek. For an even baking, rotate 180°.If the top gets done before the bottom, you will need to move the stone or jelly pane to a lower shelf before the next round. On the contrary, if the bottom crisps before the cheese caramelizes, then you will need to raise the stone or jelly.

15. Take the pizza out of the oven and transfer it to a cutting board or your plate. In order to allow the cheese to set a little, wait 3-5 minutes before slicing or serving.

FOR THE PIZZA SAUCE I MADE


YOU NEED

Olive oil- 2 tbsp
Sweet red onions (chopped)- 1 cup
Tomatoes- 2
tomato puree- 1 cup
tomato sauce- 1 tbsp
Tabasco- a few drops
green bell peppers (finely chopped)- 1/2
spring onions- 1
red chilly flakes- 1 tsp
oregano- 1/2 tsp
Italian seasoning- 1 tsp
dried parsley (ajwain)- 1/2 tsp
salt and pepper to taste

You have to
  1. Heat oil in a pan. add all the dried herbs (oregano, italian seasoning, parsley and chilly flakes).
  2. add the chopped red onions. saute.
  3. add the chopped tomatoes along with the bell peppers. saute.
  4. add salt and let the vegetables cook.
  5. add the tomato puree along with the tomato sauce and the tobasco. add salt and pepper.
  6. cook till the mixture becomes pulpy. check for seasoning.
  7. the sauce will be thick and chunky.
for the topping
sliced green bell peppers
sliced sweet red onions
mozerella cheese

I got this sauce recipe from a friend of mine. It tastes really fresh and because we like our food spicy, we can adjust the red chilly flakes according to our taste.
the pizzas are surely going to be made more often.
enjoy.

Friday, September 19, 2008

TOASTED SWEET BELL PEPPERS AND CHEESE SANDWICH


I do not know what happened. I posted this post, and when I went to edit it, there was an error and the post got deleted!!!!!!!!!!!!!!!!!. And here I am re-writing the post. God, I think I need to polish my tech skills. (I wonder if it had anything to do with that......). anyways, let me get back to the post.

As I had mentioned that I have developed this thing for roasted/ grilled bell peppers. specially the red and the orange variety. It was my untimely craving of grilled pannin sandwich, that made me recreate them at home. Though we dont have a grill, I roasted some bell pepper on high heat, in a pan and then added it the regular tosted cheese sandwich. It came out delish.
So I promised myself to make it next time and take a few pictures. Made it a couple of days back again and this time took some yummy pictures. here goes the recipe

You will need
  • 2 slices of whole wheat bread
  • 1 cup mixed bell peppers (red, green, orange, yellow, cut into thin strips)
  • 1-2 slice of pepper jack cheese
  • 1 spring onion (cut into long pieces)
  • 1 tomato cut into thin rounds
  • 1 tbsp butter
  • salt and pepper to taste.

You have to
  1. heat around 1/4tsp of the butter in a pan.
  2. roast the bell peppers and the green onions.
  3. they should not be overcooked. check for charred marks on the bell pepper.
  4. butter the slices of bread on all the sides.
  5. place the cheese slices on one of the bread.
  6. top it with the roasted bell peppers and the green onions.
  7. place the tomato slices on top. cover with the other slice.
  8. place the sandwich on the pan and press. toast the sandwich on both sides till the cheese melts.
  9. enjoy.

Tuesday, July 22, 2008

STUFFED BUNS

Even though its a Tuesday and I should be posting my week's menu, I feel its much more exciting to post my "bun-ny" experience..
I wanted to post this recipe earlier but somehow that was not happening, so I thought why not postpone the menu for a day.
OK so talking about my bun-ny experience, well I did search for a lot of burger bun recipes and came across tons of them. One in particular looked simple, and I did not have to go through the trouble of making any conversions or changes in ingredient quantities. With just the addition of an egg, I went on to follow the recipe (that I found online) and voila........there they were fluffy, round and soft burger buns.
Now comes the question of, why stuffed? Well I wanted to send these in for Breadbaking day event hosted by Aparna of My diverse kitchen. I thought why not try stuffed buns instead of regular buns. Back in college in Kolkatta, there was this bread shop called hot breads, they served delicious stuffed masala buns, so that was it, I got into my apron and kneaded up some dough.
Here is the recipe
You will need
for the bun
  • warm water- 1 cup
  • sugar- 1 tsp
  • dry yeast- 1 tbsp
  • warm milk- 3/4th cup
  • butter- 1/4th cup
  • salt- 1,1/2 tsp
  • flour- 3 1/2 cups, (1 cup additional for the rolling out process).
  • egg- 1 whole
  • egg white- 1
  • red chilli flakes- 1/2 tsp
  • sesame seeds- 1 tbsp
  • olive oil- a little
for the filling
  • ricotta cheese- 1/2 cup
  • thawed and boiled spinach- 1 cup
  • crushed garlic- 1-2 pods
  • salt and pepper to taste.


You have to

for the filling
  1. In a bowl,mix the ricotta cheese along with the spinach. add the crushed garlic along with the seasoning. You can add other seasonings too.
  2. combine everything together, check for salt. keep it aside.
for the buns
  1. proof the yeast in 1 cup of water with sugar. let it foam for around 10 mins.
  2. knead together the flour, butter, red chili flakes milk and salt and egg.
  3. add the foamed yeast to the flour mixture and begin to knead.
  4. here the dough gets sticky.
  5. let it stand for around 10 more mins.
  6. knead the dough. here you might need some dry flour,use it. knead the dough till smooth and elastic.
  7. grease a big bowl, and place dough in it, covered.
  8. leave it to rise for at least an hour to hour an a half.
  9. punch the dough down.
  10. take it out on a floured surface.
  11. knead the dough. shape them into balls.
  12. to add filling, roll some dough into a ball, make a depression in the center of the ball, and add the filling in the middle. pinch the dough back to seal it.
  13. roll again into a round.
  14. cover and let it stand for another 30- 40 mins.
  15. preheat oven to 375 degrees Fahrenheit.
  16. brush with an egg wash (egg white and water mixture). sprinkle sesame seeds.
  17. bake for 20 mins, or till nice and brown.
some points to note.
  1. while taking the dough out of the bowl onto the floured board, make sure you dip your fingers in oil. this way the dough won't stick.
  2. while shaping the dough, it is important to keep adding some dry flour, so that shaping becomes easier.
  3. keeping the dough soft and sticky will help in producing soft buns.

enjoy


Saturday, July 12, 2008

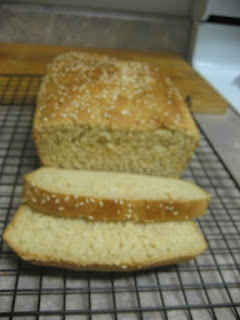
Its fresh, its warm, its home made wheat bread......


I simply love the warm aroma of freshly baked bread. I remember as kids, back in Kolkatta (India) every morning as we walked to school, a few of the bakeries there would be baking fresh bread. And on Sundays, dad use to get fresh bread from the bakeries, still warm. We watched as mom spread butter on it, and it slowly melted right into the bread. simply delicious.
I guess my taste for bread developed right there. I love bread, all types. So when it came to my internship in my college, (I had specialised in food and nutrition), I opted for an internship in the bakery of a five star hotel. Though one month was not enough, however I managed to pick up as much as I could.
It was only yesterday, after a long time I thought of finding out, whether I still remember any of it. So I decided to bake some fresh bread at home.

Looked around for a few recipes, and found two. Made a few changes and baked this warm, whole wheat sesame bread. here is the recipe

You will need

1/2 tbsp active dry yeast
1 cup warm milk
1/2 tbsp sugar
1/8 tsp salt
1 cup whole wheat flour
1, 3/4 cup all purpose flour
1/4Th cup butter, melted
3 tbsp olive oil
1/2 tsp sesame seeds


You have to:

  1. Mix the flours and the salt together. keep aside.
  2. in a bowl, take the warm milk, add sugar, yeast and around 1/2 cup of the flour. keep aside for 20 mins. till the mixture ferments and rises up.
  3. now make a hole in the center of the rest of the flour. add the melted butter.
  4. slowly add the fermented mixture little by little. mixing it with the rest of the flour.
  5. knead into a soft dough.
  6. here the dough can get sticky. take little olive oil in your hands and knead the dough. make sure the dough is soft and not very dry.
  7. cover and keep in a warm place for at least 1- 1,1/2 hours.
  8. take little olive oil in your hands, and punch the dough down. take it out on a floured surface.
  9. knead the dough, pressing it with your palms. stretch it, and fold it. knead till smooth. You will need to keep adding flour to the surface for kneading.
  10. grease a loaf pan. shape the dough into a loaf.
  11. place it in the loaf pan, and leave to proof. this will take another half an hour.
  12. brush the top with little milk. sprinkle the sesame seeds.
  13. the loaf should be double in size. bake in a preheated oven at 350 degree Fahrenheit for 30-35 minutes or till golden brown.
  14. cool on wire rack. slice.

It tasted really good toasted. I have wrapped it in foil and kept it. Lets see its shelf life.

enjoy.


Friday, June 13, 2008

CORN ON TOAST


I made this for Sunday brunch a couple of weeks back. Usually my husband and I get up late on Saturday's, and Sunday's, so its usually brunch, that we eat. I somehow feel lazy to cook on weekends. I guess the whole idea that its the weekend, makes me want to just laze around.

there was fresh french bread that I had bought the day before, and that needed to be used up, before it got stale. and just the craving of having something nice and warm, drove me to the kitchen.

here is the recipe.

You will need

  • bread (any kind, I used french bread baguette)- 3-4 slices
  • mayonnaise- 1 cup
  • tinned corn- 1/2 a tin or around 1 cup
  • grated mozzarella cheese
  • green chillies or jalapenos pepper (finely chopped)- 1/2 tsp
  • onion (finely chopped)- 1 tbsp
  • tomato sauce- 1-2 tsp
  • coriander- 1 tbsp
  • salt- to taste
  • pepper
  • all purpose Italian seasoning(optional)- 1/4th tsp
  • white sauce- 1 cup (recipe below)

for the white sauce

  • all purpose flour or maida- 2 tbsp
  • butter- 2 tbsp
  • milk- 1/2 to 1 cup.
  • oregano- a pinch
  • salt- to taste
  • pepper
for the white sauce

You have to

  1. heat the butter in a pan.
  2. add the flour and saute for 5- 10 mins.
  3. beating with one hand, keep adding the milk little by little, mixing all the time, so that no lumps are formed.
  4. keep stirring and cooking, till the mixture begins to thicken. add salt and pepper.
  5. cook on low heat, stirring, till the sauce thickens up.add the oregano. turn off the heat.
for the toast

  1. heat oven to 350 degree Fahrenheit.
  2. in a bowl, add the mayo, the corn, the onions, jalapenos, coriander, tomato sauce along with the seasonings. mix well.
  3. add all this to the white sauce.
  4. check for seasoning.
  5. top each bread with the corn mixture. sprinkle shredded mozzarella. and bake till cheese melts, and the bread begins to brown.
  6. serve hot

Friday, May 23, 2008

VEGGIE GARDEN BURGER

This is somthing I make all the time. Since my husband is a vegetarain, our freezer always has THE BOCA GARDEN BURGER PATTY. These are meatless patties made out of soy. Spice it up a bit, add a little Indian twist to it, and voila!!!!!!, a good, wholesome burger to enjoy.

I even pack it for lunch somtimes. The other day when I was making it, suddenly, The sandwich festival of 2008, hosted by anupama of Food-n-More came to my mind. I got my camera, and clicked a few pictures, and here I am sharing the recipe with you'll, and posting it as an entry to the event.


This burger could actually fit a vegan diet too, cause instead of real cheese, I used cheese alternatives, which I got from HENRY'S, a fresh produce store. I used the pepper jack flavoured ones.

You will need:

  • burger buns- 4 slices halved
  • garden boca patty- 2
  • lettuce- 2 leaves
  • red onions- 1/2
  • tomato- 2
  • jalepenos- 2-3
  • cheese alternatives or regular cheese slices- 2
  • maggi hot and sweet tomato ketchup- 2 tbsp
  • butter- 1 tbsp

You have to:
  1. slice the tomatoes into rounds
  2. slice onions. wash and dry the lettuce leaves.
  3. heat butter in a pan.
  4. saute the onions, till caremalized. add little bit of the tomato sauce.
  5. in the same pan, heat the boca patty throughly.(these are frozen, so microwave it for a few seconds.
  6. slightly toast the buns, with a little more butter, in the same pan.
  7. take a plate. place the burger buns.
  8. place the lettuce.
  9. spread a little of the tomato sauce.
  10. place the patty on top.
  11. top it with the onions, and the round tomato slices and some chopped jalepenos.
  12. place the cheese slice. sprinkle some salt and pepper. close with the other bun.
  13. enjoy......

note: this burger can have loads of variations. I somtimes put some coleslaw salad too. To give it a more indian taste, one can add green chutney. I used sesame buns here, coz that is what I had on hand, but any buns would be fine.

happy eating.

Friday, July 20, 2007

CHEESY CRUNCHY GARLIC BREAD

It was Sunday, and my husband and I really did not want to go out and eat. So Ithought of making something at home.


A few days earlier,I had got this par baked bread from trader joes and some herbed mozzarella cheese. Made some cheesy,crunchy,garlic bread. Made a quick salad and some pasta. Had a nice itallian dinner with some white wine.

here is the recipe for the garlic bread. manged to take a picture too......check out the nice cheesy crust,and the herbs.


ingredients

butter-1/4 cup
crushed garlic- 1/2 cup
chopped coriander leaves- 1 tbsp
salt and pepper- to taste
oregano- 1/4th tsp
herbed mozzarella (can use regular mozzarella too)- a few slices....depending how much cheese you like.
bread (can make it with any bread, thats at home)- 4-5 slices.

method

  • mince the garlic with a kinfe on achopping board, really fine.
  • in a bowl add the butter, the minced garlic, chopped corainder,salt and pepper and the oregano.mix all this well.
  • spread the mixture over the bread.
  • top with slices of mozzarella.
  • bake in a hot oven at 450.
  • serve hot with soup or pasta or salad


enjoy..........